
Working on a MacBook in airports, hotel lobbies, and shared lounges creates a specific set of problems that most travelers never fully solve. Screens face the wrong direction. Necks ache after an hour. Unsecured WiFi puts client data at risk. And anyone sitting nearby can read your screen without effort. A well-planned travel setup removes all of that friction, turning any flat surface into a functional, private, ergonomic workspace. This guide covers what to pack, how to set up fast, and how to protect your screen and data every time you open your MacBook in a shared space.
Table of Contents
-
Protecting your data and screen privacy in shared environments
-
Why most travelers overlook workspace privacy—and what actually works
-
Optimize your travel setup with premium MacBook privacy solutions
Key Takeaways
| Point | Details |
|---|---|
| Essential travel tools | A Roost stand, compact keyboard, and ergonomic mouse boost comfort and productivity for MacBook users on the road. |
| Efficient packing strategies | Organize tech accessories in a pouch and prioritize light, protective gear for easy access and setup. |
| Privacy and security | Using VPNs and privacy screens is critical for protecting your work and data in shared spaces. |
| Workspace optimization | Fast setup and ergonomics in airport lounges and hotels help maximize productivity during travel. |
| Expert routines matter | Simple, repeatable workspace routines often outperform complex tech setups for business travelers. |
What you need for an effective MacBook travel setup
The right accessories make the difference between a productive two-hour work session and a frustrating one. You do not need to carry a lot. You need to carry the right things.
A travel ergonomic setup built around the Roost Laptop Stand, Keychron B1 Pro keyboard, and Logitech MX Master mouse can be assembled in under 60 seconds. The Roost stand weighs just 5.8 oz and adjusts from 6 to 14 inches, raising your MacBook screen to eye level. The Keychron B1 Pro weighs 0.94 lbs, uses scissor switches, runs for up to 1,200 hours on a single charge, and uses a Mac-specific layout. The MX Master mouse adds precision and reduces wrist strain compared to a trackpad for long sessions.
Beyond ergonomics, a Thunderbolt dock expands your connectivity without adding multiple cables. A compact USB-C hub works for lighter needs. And a privacy screen for travelers blocks side-angle views, which is one of the most overlooked items in any travel kit.
Here is a comparison of the core accessories:
| Accessory | Weight | Key feature | Best for |
|---|---|---|---|
| Roost Laptop Stand | 5.8 oz | Adjustable height, foldable | Screen elevation |
| Keychron B1 Pro | 0.94 lbs | 1,200-hr battery, Mac layout | Typing comfort |
| Logitech MX Master | 4.9 oz | Ergonomic shape, precise scroll | Extended mouse use |
| CalDigit TS5 Dock | 1.4 lbs | Thunderbolt 5, 140W charging | Hotel multi-monitor |
| Clarmuse Privacy Screen | Varies by model | Magnetic attach, MacBook-specific fit | Screen privacy |
Key items to include in your travel tech kit:
-
Roost stand or similar foldable laptop stand
-
Compact wireless keyboard with Mac layout
-
Ergonomic travel mouse
-
USB-C or Thunderbolt hub or dock
-
Magnetic privacy screen for your MacBook model
-
Short USB-C cable for charging
-
Power adapter with international plug compatibility
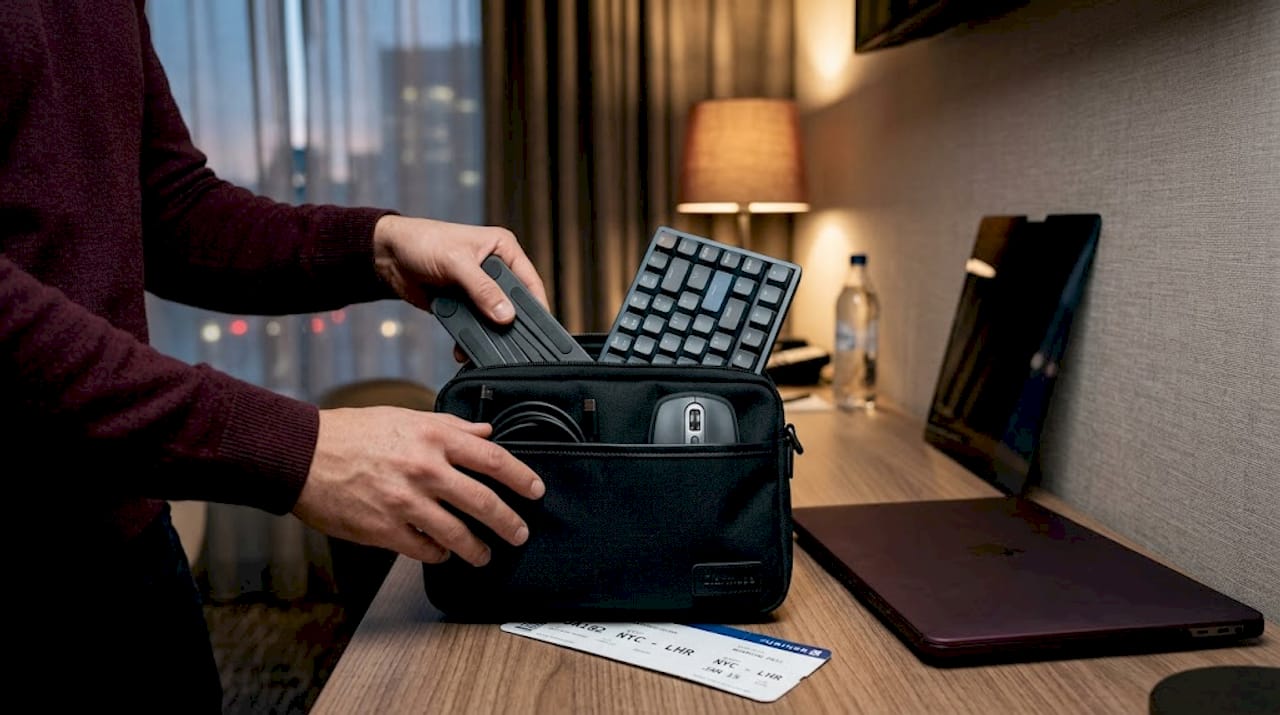
Pro Tip: Store all accessories in a single compact tech pouch. When you arrive at your seat or desk, you pull out one bag instead of searching through your entire carry-on. Setup time drops from several minutes to under 90 seconds.
Packing for privacy and productivity
Packing well is not about fitting more in. It is about organizing what you have so everything is accessible and protected. For MacBook travel, that means treating your accessories as a system, not a collection of individual items.
The Roost stand and Keychron keyboard fit in a standard backpack without taking up significant space. A hard-shell case for your mouse protects it from pressure damage in overhead bins. Prioritize airport lounges over gate seating whenever possible, since lounges offer dedicated power outlets, quieter environments, and more stable surfaces for your setup.
Your MacBook itself should travel in a sleeve inside your main bag, not in an exterior pocket. Exterior pockets are more vulnerable to bumps and theft. A padded sleeve adds protection without significant weight.
Packing checklist for a privacy-focused travel setup:
-
MacBook in padded sleeve, stored in main compartment
-
Tech pouch with stand, keyboard, mouse, hub, and cables
-
Privacy screen stored flat against the MacBook sleeve
-
VPN app pre-installed and configured before departure
-
Backup USB-C cable in a secondary pocket
-
Power bank for sessions without outlet access
For the privacy screen specifically, magnetic attachment models are the easiest to pack and use. You do not need to align adhesive edges or peel protective layers. You attach it when you sit down and remove it when you pack up. That simplicity matters when you are moving between spaces multiple times a day.
Pro Tip: Orient your keyboard and mouse in the tech pouch so the keyboard sits flat and the mouse is on top. When you open the pouch at your destination, everything is ready to place without rearranging.
Setting up your workspace in airport lounges and hotels
Packing the right gear is just the start. Converting a lounge chair or hotel desk into a real workspace takes a consistent routine.
Airport lounges provide desks, AC outlets, and dedicated workstations. Access is available through business or first-class tickets, Priority Pass membership, or cards like the Amex Platinum. Arriving three hours before your flight gives you enough time to set up, work a full session, and still board comfortably.
For hotel rooms, the desk setup is usually more controlled. You have a fixed surface, a nearby outlet, and no one looking over your shoulder. That said, hotel desks are often low and poorly lit. Bringing your stand and keyboard makes a significant difference in posture and output quality.
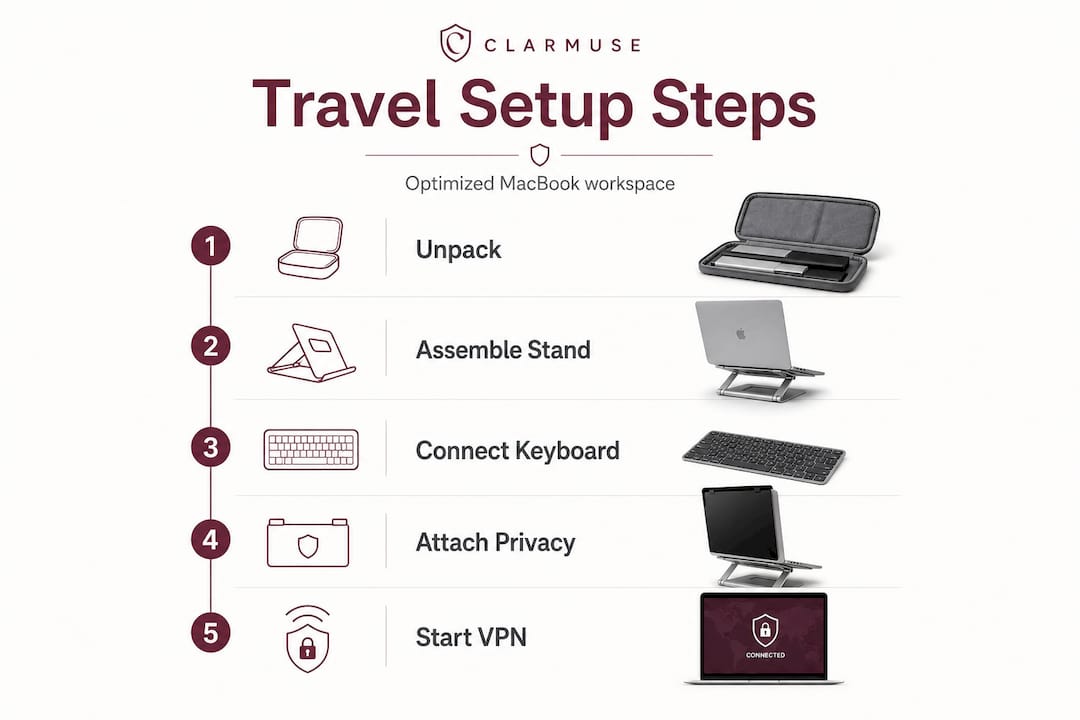
Step-by-step setup for any shared workspace:
-
Choose your seat. Back to a wall, screen facing away from foot traffic.
-
Place the Roost stand on the desk and open your MacBook onto it.
-
Connect your Thunderbolt dock or USB-C hub to the MacBook.
-
Place the keyboard and mouse in front of the stand.
-
Attach your privacy screen magnetically to the MacBook display.
-
Connect to WiFi and activate your VPN before opening any work apps.
-
Adjust stand height so the top of the screen sits at or just below eye level.
For hotel setups with external monitors, a Thunderbolt dock like the CalDigit TS5 supports up to two 6K displays at 60Hz on macOS and delivers 140W of charging through a single cable. That means one cable connects your MacBook to power, display, and peripherals simultaneously. It is a significant upgrade for hotel rooms with a monitor available.
Ergonomic note: Raising your screen to eye level keeps your neck in a neutral position. Placing your keyboard at elbow height keeps your wrists neutral. Positioning your elbows at shoulder width opens your shoulders. These three adjustments, supported by CDC NIOSH research on monitor height and musculoskeletal strain, reduce the risk of neck pain, carpal tunnel pressure, and cervical strain during long work sessions.
Here is a comparison of workspace features across common travel environments:
| Feature | Airport lounge | Hotel room | Gate seating | Café |
|---|---|---|---|---|
| Dedicated desk | Often available | Usually available | Rarely available | Usually available |
| AC outlets | Yes | Yes | Limited | Varies |
| Privacy level | Medium | High | Low | Low to medium |
| Noise level | Low to medium | Low | High | Medium |
| WiFi reliability | Good | Good | Variable | Variable |
| Setup space | Moderate | Generous | Minimal | Moderate |
Pro Tip: Arrive at the lounge early and claim a seat near an outlet and a wall. Corner seats give you the best screen privacy without needing to rely entirely on a filter.
Also consider using privacy screens for offices if you frequently work in hotel business centers, where the setup is more like an open office than a private room.
Protecting your data and screen privacy in shared environments
Workspace comfort counts, but so does privacy and security. Public WiFi in airports and hotels is a real risk, not a theoretical one.
Using a VPN on public networks prevents several attack types. API timeouts on throttled networks occur in 60% of cases without a VPN, and packet sniffing on open networks can expose login credentials, session tokens, and file transfers. WireGuard is currently the fastest VPN protocol available, offering lower latency and better throughput than OpenVPN or IKEv2, especially on congested hotel networks. Setting your VPN to auto-connect on wake means you never accidentally work unprotected after opening your MacBook.
Physical screen privacy is equally important. In a lounge or café, anyone seated at a 45-degree angle to your screen can read your content without effort. A privacy filter narrows the viewing angle so only the person directly in front of the screen can see it clearly. Understanding how privacy filters work helps you choose the right one and use it correctly.
Best practices for data and screen security while traveling:
-
VPN: Enable before connecting to any public or hotel WiFi. Use WireGuard protocol where available.
-
Privacy screen: Attach before opening sensitive documents, emails, or financial data.
-
Screen angle: Position your MacBook so the display faces a wall or window, not foot traffic.
-
Auto-lock: Set your MacBook to lock after 60 seconds of inactivity.
-
FileVault: Keep full-disk encryption active on your MacBook at all times.
-
Airdrop: Set to “Contacts Only” or “No One” in public spaces.
The combination of a VPN and a physical privacy screen covers both digital and visual exposure. Neither one alone is sufficient. A VPN does not stop someone from reading your screen. A privacy screen does not protect your data on an unsecured network.
Pro Tip: Enable auto-connect VPN and use WireGuard protocol for the best balance of speed and security. Test your VPN connection before your trip to confirm it works on your MacBook model and does not conflict with any work security tools.
Why most travelers overlook workspace privacy—and what actually works
Most business travelers focus on gear and overlook routine. They buy the right stand, the right keyboard, and then skip the privacy screen because setup feels like one step too many. That is the gap where problems happen.
Screen glare, lack of privacy, rushed setups, and poor posture are not random inconveniences. They are predictable outcomes of skipping consistent habits. The traveler who sets up the same way every time, stand first, keyboard second, privacy screen third, VPN before opening apps, builds a routine that takes less mental effort over time.
Travel privacy screen tips consistently point to one insight: the best privacy tool is the one you actually use. Magnetic attachment screens win here because they remove the friction of installation. There is no alignment process, no adhesive, no waiting. You attach it and it works.
The same logic applies to office privacy screen solutions. Whether you are in a hotel business center or an open-plan coworking space, a screen that installs in seconds gets used every session. One that requires careful alignment gets left in the bag.
VPNs follow the same pattern. Auto-connect removes the decision entirely. You open your MacBook, the VPN connects, and you work. There is no moment where you forget and spend 20 minutes on an open network.
The travelers who protect their data and screen consistently are not the ones with the most sophisticated setups. They are the ones with the most repeatable ones. Invest in tools that reduce friction, build a setup routine you can execute in under two minutes, and you will work more securely and comfortably than most people in any lounge or hotel desk you ever sit at.
Optimize your travel setup with premium MacBook privacy solutions
A complete travel setup addresses both comfort and privacy. The physical screen filter is one of the most practical additions you can make, and it is the one most often skipped.
Clarmuse designs privacy screen filters specifically for MacBook Air and MacBook Pro models, with magnetic attachment that takes seconds to apply and remove. There are no adhesives, no alignment guides, and no bulk added to your setup. The magnetic privacy screen for MacBook Pro 14 is a direct example: model-specific fit, clean design, and side-angle blocking that works in lounges, cafés, trains, and hotel lobbies. If you work in shared spaces regularly, it belongs in your tech pouch alongside your stand and keyboard.
Frequently asked questions
What are the best MacBook accessories for business travel?
The Roost stand, Keychron keyboard, and MX Master mouse create a fast, ergonomic setup that fits in a standard backpack and assembles in under 60 seconds.
How do I keep my MacBook screen private in shared spaces?
Use a magnetic privacy screen and position your seat with your back to a wall so the display faces away from foot traffic.
Which VPN protocol is fastest for hotel or airport WiFi?
WireGuard protocol consistently offers the best speed and stability on congested public networks, with lower latency than OpenVPN or IKEv2.
How can I work comfortably in airport lounges?
Arrive three hours early, claim a corner seat near an outlet, and use a stand to raise your screen to eye level in the designated work areas.
Are Thunderbolt docks worth packing for travel?
Yes, if your hotel has an external monitor or you need multiple peripherals. The CalDigit TS5 dock supports two 6K displays and 140W charging through a single cable, which simplifies any hotel desk setup significantly.


