
You open your MacBook at a coffee shop, pull up a client proposal, and then notice the person at the next table glancing over. It happens constantly in cafés, libraries, coworking spaces, and airport lounges. Sensitive documents, private messages, financial data, and study notes are all visible to anyone seated nearby. This guide covers the tools you need, how to physically position your screen, and how to handle edge cases so you can work in public with confidence.
Table of Contents
- What you need for MacBook privacy in public
- Step-by-step: Positioning your MacBook screen for maximum privacy
- Dealing with edge cases: Color work, lid closure, and installation issues
- What’s next: Future of MacBook privacy technology
- A realistic take: Smart habits matter more than any single product
- Find the right MacBook privacy solution for you
- Frequently asked questions
Key Takeaways
| Point | Details |
|---|---|
| Physical privacy filters work | The most effective way to block prying eyes is with a micro-louver privacy screen filter specifically for your MacBook. |
| Positioning matters | Choosing the right seating and screen angle in public makes it much harder for others to see your screen. |
| Watch for edge cases | Filters can affect brightness and color, and the installation method must fit your workflow and MacBook model. |
| Future tech is coming | Dynamic privacy displays are likely for MacBooks in a few years, but external filters are today’s solution. |
| Habits protect privacy | Staying alert and combining hardware with smart practices is the best way to keep your information safe in public. |
What you need for MacBook privacy in public
Effective screen privacy in public settings starts with understanding your options. Physical privacy tools are the most reliable first line of defense, and the right choice depends on your workflow, travel habits, and MacBook model.
Common privacy tools
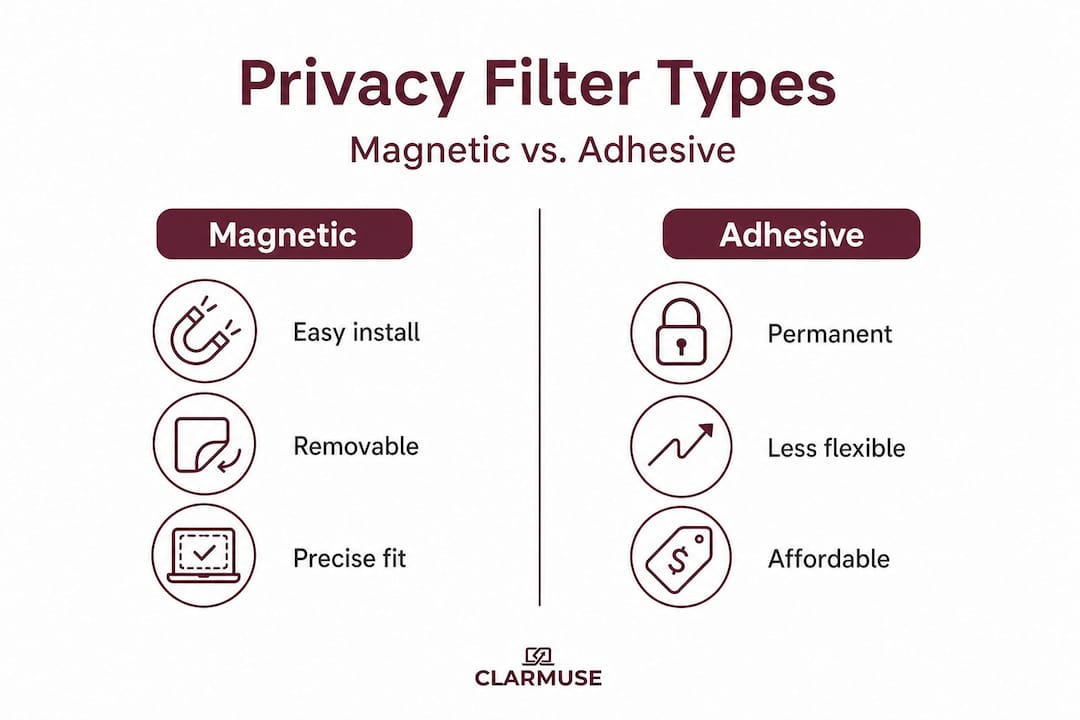
- Magnetic privacy filters. Attach directly to your MacBook’s display bezel using built-in magnets. Easy to put on and take off, no adhesive required.
- Adhesive privacy filters. Stick to the screen surface permanently or semi-permanently. Slimmer profile, but harder to remove for color-critical tasks.
- Slide-in filters. Fit between the screen and the lid frame. Less common, and fit can vary by model.
- Display-side engineering. Some newer laptop displays include limited off-axis darkening natively, though this is not yet standard in Apple products.
The core technology behind most physical filters is micro-louver optical film. Think of it like a set of microscopic window blinds layered across your screen. Light passes straight through to the person facing the screen, but it is blocked at sharp angles. Viewing-angle restriction is the primary method used to solve MacBook screen privacy in public, achieved through this micro-louver approach.
Vendors typically specify a ±30° viewing cone for their filters, meaning anyone seated more than 30 degrees to the left or right of the screen center sees a dark or unreadable display. It is a straightforward concept that works well in practice.
Filter comparison table
| Filter type | Ease of use | Privacy level | Color impact | Lid closure |
|---|---|---|---|---|
| Magnetic | High | High | Moderate | Usually safe |
| Adhesive | Low | High | Low to moderate | Usually safe |
| Slide-in | Medium | Medium | Low | Check model |
| No filter | N/A | None | None | N/A |
One real tradeoff to consider: privacy filters reduce brightness and can shift color accuracy. For general office work, email, and writing, this is rarely a problem. For photographers or video editors doing color work, it matters more.
You can read a detailed breakdown of how MacBook privacy filters work before making a purchasing decision. If you use a MacBook Pro, a purpose-fit magnetic privacy screen for MacBook Pro is worth looking at for precise sizing and clean attachment.
Pro Tip: Before buying any privacy filter, check whether the product allows full lid closure without pressure on the screen. Some thicker filters add enough height to stress the hinge or touch the keyboard when closed.
Step-by-step: Positioning your MacBook screen for maximum privacy
With your tools in place, here is how to physically position your MacBook for stronger privacy. Hardware filters do most of the work, but seating position adds an extra layer of protection that costs nothing.
“The best-practice approach for shared public spaces is to use a fitted privacy filter combined with seating and positioning that places onlookers further off-axis.” Kensington security blog
Positioning steps
-
Survey the space before sitting. Walk the room or scan the seating layout. Note where foot traffic moves, where people tend to gather, and which seats have open sightlines to your screen.
-
Choose wall or corner seating first. A seat with your back to the wall eliminates anyone approaching from behind. A corner narrows the angles from which someone could see your screen. This is the single most effective positioning habit you can build.
-
Orient your screen away from foot traffic. In a café, this usually means facing a wall, window, or corner rather than an aisle. In a library, sit facing the shelves rather than an open floor area.
-
Adjust your screen angle. Tilt the display slightly back or forward to reduce the vertical viewing angle for someone standing nearby. Most MacBook screens are brightest when tilted to match your eye level, so small adjustments here also improve comfort.
-
Confirm with a side-check. Once seated, stand up and move to the side of your setup. If you have a privacy filter, the screen should look dark or unreadable from a 45-degree angle. If you do not have a filter, you will see clearly how exposed your screen actually is. This check takes about five seconds and builds useful awareness.
A public space privacy guide covers environment-specific strategies in more detail if you work regularly across different venue types.
You can also improve practical privacy by controlling where your MacBook screen sits relative to nearby bystanders, which is especially relevant in open-plan offices or coworking spaces with shared bench seating.
Seating comparison table
| Seating position | Privacy effectiveness | Notes |
|---|---|---|
| Back to wall, corner | High | Best option in almost any venue |
| Back to wall, center | Medium-high | Good, but side angles can still expose screen |
| Open floor area, facing crowd | Low | Avoid for sensitive work |
| Window seat, back to room | Medium | Depends on reflection and traffic |
| Coworking bench, no filter | Very low | Add magnetic filter as minimum protection |
Pro Tip: For layered protection, combine a magnetic privacy filter with a corner seat. The filter handles side views, and the wall eliminates views from behind. Together, they cover almost every angle a casual observer might use.
Dealing with edge cases: Color work, lid closure, and installation issues
Even with the right setup, a few edge cases can impact user experience. Here is how to handle them before they become problems.
Color grading and creative work
Privacy filters reduce the amount of light passing through the screen and can shift the perceived color temperature slightly. For everyday tasks this is unnoticeable. For photo editing, video color grading, or graphic design, brightness and color accuracy can be noticeably affected.
The practical solution is straightforward. Use your privacy filter during general work, then remove it when you shift to color-sensitive tasks. Magnetic filters make this genuinely easy since they take about three seconds to detach. This is a major advantage magnetic formats have over adhesive options, where removal risks the screen coating and is not meant to be done repeatedly.
If your work is entirely creative and color-critical, a high-clarity filter option can reduce the visual impact, though some trade-off will always remain with current technology.
Webcam and sensor clearance
MacBook Air and Pro models have a front-facing camera, Face ID (on some models), and ambient light sensors located in the display notch or top bezel. Precision-fit privacy screens are designed to leave these areas clear, but it is worth confirming before you install.
Check the product’s compatibility notes for your specific MacBook model and year. A filter cut for a 14-inch MacBook Pro 2023 is not the same as one cut for a 14-inch MacBook Pro 2021. The notch size and bezel dimensions differ.
Lid closure and hinge issues
The most commonly reported installation issue with privacy filters is the lid not closing properly. Adhesive and slide-in formats sometimes add enough thickness to create pressure on the keyboard row when the lid closes.
Common installation mistakes to avoid
- Installing a filter sized for a different MacBook model (even one generation off can cause misalignment)
- Applying an adhesive filter without cleaning the screen surface first, which causes lifting at the edges
- Attaching a magnetic filter with the wrong orientation, which can cover the webcam
- Forcing the lid closed when there is visible resistance, which can damage the hinge over time
- Buying a generic universal filter instead of a MacBook-specific cut, resulting in uneven edges and reduced effectiveness
Students working in classrooms and libraries face specific shared-space challenges. A dedicated students’ privacy screen guide covers those scenarios in more practical detail, including low-light environments and shared desk setups.
What’s next: Future of MacBook privacy technology
If you are considering your next MacBook purchase, here is what is on the horizon for built-in privacy features.
Researchers and display manufacturers have been developing what is often called a dynamic privacy display. The concept is a screen that can switch between a wide viewing angle for presentations or collaborative work, and a narrow angle for private individual use. No physical filter needed. The switch could be controlled by software or a keyboard shortcut.
Built-in privacy display technology for laptops is reported as a near-future development direction, with Omdia research suggesting possible integration by 2029. Apple has not confirmed any plans, and no MacBook currently ships with this feature.
Key takeaways comparing current and future privacy technology
- Current magnetic filters are reliable, removable, and available today for all major MacBook models
- Adhesive filters offer a slimmer profile but sacrifice flexibility
- Built-in dynamic privacy displays would eliminate the need for external filters entirely
- Until built-in solutions arrive, a physical filter remains the most practical option for most users
- Any built-in solution would still benefit from smart seating habits to reduce ambient screen visibility
The practical takeaway: do not wait. A physical magnetic filter solves the problem today, and if Apple eventually ships a built-in privacy display, the habits you build now around seating and positioning will still apply.
A realistic take: Smart habits matter more than any single product
Stepping back, here is the honest assessment of what actually protects your screen in public.
Privacy filters are useful and worth using. But they create a specific risk when used alone: a false sense of complete protection. A filter blocks side angles, but it does nothing about the person sitting directly behind you, or someone looking over your shoulder while you type at a standing desk. No single product covers every angle.
The strongest privacy setups combine three layers: physical hardware like a magnetic filter, strategic seating so fewer people have any angle on your screen at all, and active screen awareness as a habit. That last layer is where most people fall short.
“No privacy tool replaces good situational awareness in a café or coworking space.”
Screen auto-lock is one of the most overlooked habits. Setting your MacBook to lock after 60 to 90 seconds of inactivity means that every time you step away for a coffee refill or a bathroom break, your screen is blank to anyone passing by. No filter needed for that specific threat. Password discipline and screen timeout settings block more casual data exposure than any physical accessory.
Explore privacy strategies for shared spaces if you want a more thorough overview of combining physical and behavioral approaches.
The contrarian point is this: people who invest in a privacy filter and then stop thinking about privacy are often less protected than people who never bought a filter but developed consistent awareness habits. The filter should be the start of your privacy practice, not the end of it.
Pro Tip: After every break, before you sit back down and open your screen, pause and scan the seating around you. Thirty seconds of fresh awareness resets your sense of who can see what, and it costs nothing.
Find the right MacBook privacy solution for you
Working in shared spaces gets noticeably more comfortable when you stop second-guessing what others can see. The combination of smart seating, screen positioning habits, and a well-fitted privacy filter covers most of what you encounter day to day in cafés, coworking spaces, airports, and classrooms.
Browse purpose-built MacBook Pro privacy screen protectors designed for precise fit and easy magnetic attachment across current MacBook Air and Pro models. If you want to go deeper before buying, the full explainer on how privacy filters work covers the technology in plain terms, including viewing angles, filter types, and what to look for by model. Both are useful starting points for choosing the setup that fits your workflow.
Frequently asked questions
Why can’t I just turn my MacBook screen brightness down for privacy?
Lowering brightness slightly reduces readability at a distance but does not prevent nearby shoulder surfers from reading your screen. Only a micro-louver privacy filter or careful positioning can reliably block off-angle viewing.
What’s the main difference between magnetic and adhesive MacBook privacy screens?
Magnetic screens are designed to attach and remove quickly without tools or adhesive, making them far easier to swap for different tasks. Adhesive and slide-in formats are more permanent and sit slightly thinner against the screen surface.
Will a privacy screen impact my color editing or creative work?
Yes. Privacy filters reduce brightness and can shift perceived color accuracy, which matters for photo editing and video grading. The practical solution is to remove the filter for color-critical sessions and reattach it for general work.
Are there built-in privacy screens coming for MacBook?
Reports suggest built-in dynamic privacy tech could appear in laptops by around 2029, but Apple has not confirmed any specific plans. Physical filters remain the practical solution available today.
How do I know if my privacy filter is effective?
Step to the side of your screen at roughly a 45-degree angle. A working filter should make the display appear dark or unreadable from that position, while remaining fully visible directly in front.


