
If your MacBook screen looks sharp at your home desk but washed out, dim, or hard to read at a café or coworking space, the problem is rarely the hardware. MacBook screen visibility explained simply means understanding the interaction between display technology, ambient light, software settings, and surface treatments. Most users assume brightness is a dial you turn up and down. The real picture is more layered than that, and getting it right in shared environments takes a combination of informed settings, smart positioning, and the right accessories.
Table of Contents
- Key takeaways
- MacBook screen visibility explained: display technology and brightness specs
- Environmental and ambient factors that affect your screen
- External display and hardware connectivity issues
- Practical ways to improve MacBook screen visibility
- My take on balancing visibility, color accuracy, and workspace comfort
- Protect your screen visibility with Clarmuse
- FAQ
Key takeaways
| Point | Details |
|---|---|
| Brightness specs matter, but not alone | Raw nit values only tell part of the story; reflections and ambient light affect perceived clarity more than spec numbers. |
| Auto-Brightness causes fluctuation | The ambient light sensor adjusts your display dynamically, which creates inconsistent visibility in shared spaces with changing light. |
| Cable quality affects external displays | Incompatible adapters can make an external monitor look dim or low resolution regardless of your MacBook settings. |
| Nano-texture trades contrast for comfort | Nano-textured displays cut glare effectively but may soften color depth, which matters depending on your workflow. |
| Accessories extend built-in features | Magnetic privacy and anti-glare screen protectors complement macOS settings to improve both comfort and visual security. |
MacBook screen visibility explained: display technology and brightness specs
Understanding what your MacBook display is actually doing starts with brightness measurement. Screen brightness is measured in nits, a unit of luminance. The higher the nit count, the more light the panel can output, which becomes critical when you are competing with windows, overhead lighting, or bright café environments.
Apple uses both Retina and Liquid Retina display technologies across its MacBook lineup. Retina displays offer high pixel density that makes text and images appear sharp at normal viewing distances. Liquid Retina builds on that with wider color support, better brightness uniformity, and improved contrast. For most shared workspace scenarios, the difference you notice most is not pixel density. It is peak brightness.
The new MacBook Air M5 delivers a Liquid Retina display with 500 nits of brightness, which provides solid readability in lit offices and classrooms. Here is how common MacBook display specs compare across scenarios:
| MacBook model | Display type | Peak brightness | Shared workspace performance |
|---|---|---|---|
| MacBook Air M5 (2026) | Liquid Retina | 500 nits | Good for offices and indoor shared spaces |
| MacBook Pro 14/16 (M4) | Liquid Retina XDR | Up to 1600 nits (HDR) | Excellent in most environments |
| MacBook Air M2/M3 | Liquid Retina | 500 nits | Solid for indoor use, limited in direct sunlight |
A few things that raw brightness numbers do not capture:
- Reflective glass surfaces can bounce ambient light back at you, effectively canceling brightness gains
- Screen resolution and scaling settings alter perceived sharpness, not just size
- The angle from which you view the screen changes how vivid and readable the display appears
- Display calibration and True Tone color shifts affect how “bright” your screen feels, even at fixed settings
Brightness capacity is the ceiling. Environmental and software factors determine how close you actually get to it.
Environmental and ambient factors that affect your screen
The single biggest source of MacBook screen issues in shared spaces is not a setting you forgot to change. It is the light around you. A bright window behind or beside you creates glare that makes even a 500-nit panel feel dim and washed out.
macOS addresses this with two adaptive features. Auto-Brightness uses an ambient light sensor to automatically adjust screen brightness when environmental lighting changes. True Tone shifts the white balance of the display to match the color temperature of the room’s lighting. Both features aim to reduce eye fatigue over long sessions. In shared environments with dynamic lighting, such as a coworking space with shifting overhead lights or a café near windows, both features can create unpredictable brightness shifts that feel like a hardware problem when they are actually software responding normally.
Practical factors that affect visibility in shared spaces include:
- Direct sunlight or bright windows in your line of sight or behind the screen
- Overhead fluorescent or LED lighting creating top-down glare on the glass surface
- People moving past your screen changing local light levels, which triggers Auto-Brightness adjustments
- Glossy MacBook screens reflecting the entire room back at you in low-contrast conditions
- Screen tilt angle catching ceiling light sources at unfavorable reflection angles
Apple offers a nano-texture display option on higher-end MacBook Pro models. Nano-texture etching scatters ambient reflections at the glass surface rather than bouncing them back as a single concentrated reflection. The result is noticeably better usability in bright rooms. The tradeoff is real, though. Nano-texture screens can make colors appear slightly muted and blacks less deep compared to standard glossy glass, which matters if you work on color-critical projects like photo editing or video.
Pro Tip: If you notice your screen feels dimmer than usual at a shared desk, look above and behind you before adjusting settings. Repositioning the screen angle by 10 to 15 degrees often resolves perceived dimness faster than any software adjustment.
External display and hardware connectivity issues
When you connect your MacBook to an external monitor in a shared office setup and the screen looks dark or blurry, most people assume the MacBook is the problem. Usually it is not. External display darkness most often results from incompatible cables or adapters that fail to support the required video signaling standards.
Apple’s MacBook ports use Thunderbolt 4 or USB-C with DisplayPort Alt Mode. Cables and adapters that are not certified for these standards may connect physically but fail to carry a full-resolution, full-brightness signal. The monitor lights up but looks wrong. This is a pipeline problem, not a hardware defect.
Follow these steps when troubleshooting an external display that looks dim or unclear:
- Confirm your cable or adapter explicitly supports DisplayPort Alt Mode, Thunderbolt 3, or Thunderbolt 4, not just USB-C data transfer.
- Check the external monitor’s own brightness settings. In shared spaces, monitor brightness is often turned down by a previous user and overlooked entirely.
- Disconnect and reconnect the cable at both ends. Signal handshake issues sometimes cause incorrectly initialized display modes.
- Open System Settings on your Mac, go to Displays, and confirm the resolution and refresh rate match the monitor’s native spec.
- Use the Brightness Up key on your keyboard or the Displays section in System Settings to adjust brightness directly for both your internal screen and compatible external monitors.
Note that Apple Silicon MacBooks have a limit on how many external displays they support simultaneously, and exceeding that limit can degrade output quality on each connected screen. MacBook Air M-series supports one external display at a time natively, while MacBook Pro models support two or more depending on the chip tier.
Pro Tip: When you move between workstations or dock setups, treat it as a pipeline verification exercise first. Confirm the adapter, cable, and monitor brightness before touching macOS display settings. You will solve most issues in under two minutes.
Practical ways to improve MacBook screen visibility
Improving MacBook screen visibility in shared environments involves four areas: software settings, physical positioning, surface treatment, and accessories. Working through each one systematically gives you consistent results regardless of where you set up.
Software settings that make a real difference
Start in System Settings by navigating to Displays. Increase brightness to your target level, then decide whether Auto-Brightness serves you in your specific work context. Turning off Auto-Brightness and True Tone removes adaptive software behavior and lets you diagnose whether ambient sensor effects were causing your visibility problems. For steady shared environments like a regular office desk, disabling both features delivers more consistent screen behavior. For varied locations, leaving them on but knowing how they work prevents frustration.
You can also adjust resolution scaling in System Settings under Displays. Choosing a higher resolution setting renders more content but makes text smaller. A slightly scaled down resolution increases text and UI size, which improves readability without raising brightness. Many users overlook this as a macbook screen clarity tip when brightness feels insufficient.
Positioning, surface treatment, and accessories
| Approach | Best for | Tradeoff |
|---|---|---|
| Screen angle adjustment | Immediate glare reduction | Requires regular repositioning |
| Nano-texture display | Bright, reflective shared offices | Slight color muting on glossy-sensitive work |
| Matte screen protector | Budget-friendly glare control | Reduces peak sharpness noticeably |
| Magnetic privacy filter | Glare reduction plus visual privacy | Slight brightness reduction at direct angle |
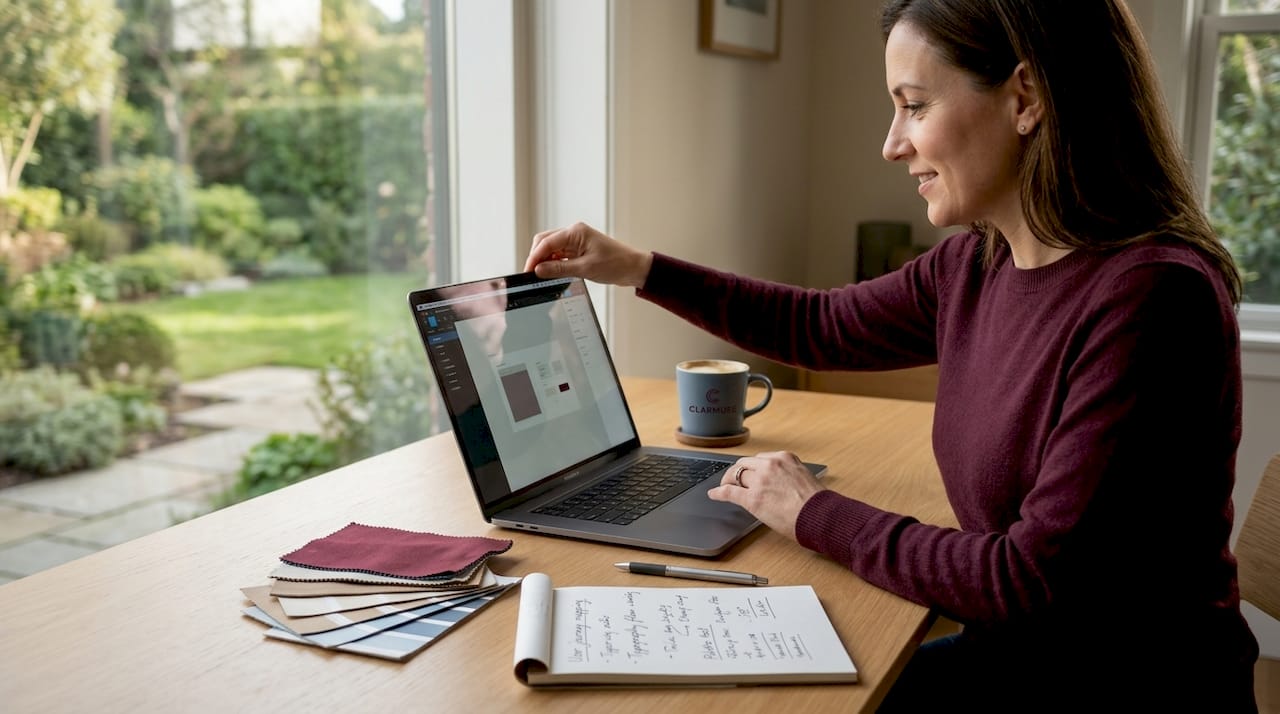
Physical positioning matters more than most guides acknowledge. Sitting with your back to windows rather than facing them eliminates the most common source of screen glare. Tilting the MacBook lid slightly forward, instead of fully upright, places the reflective surface at an angle less likely to catch overhead light.
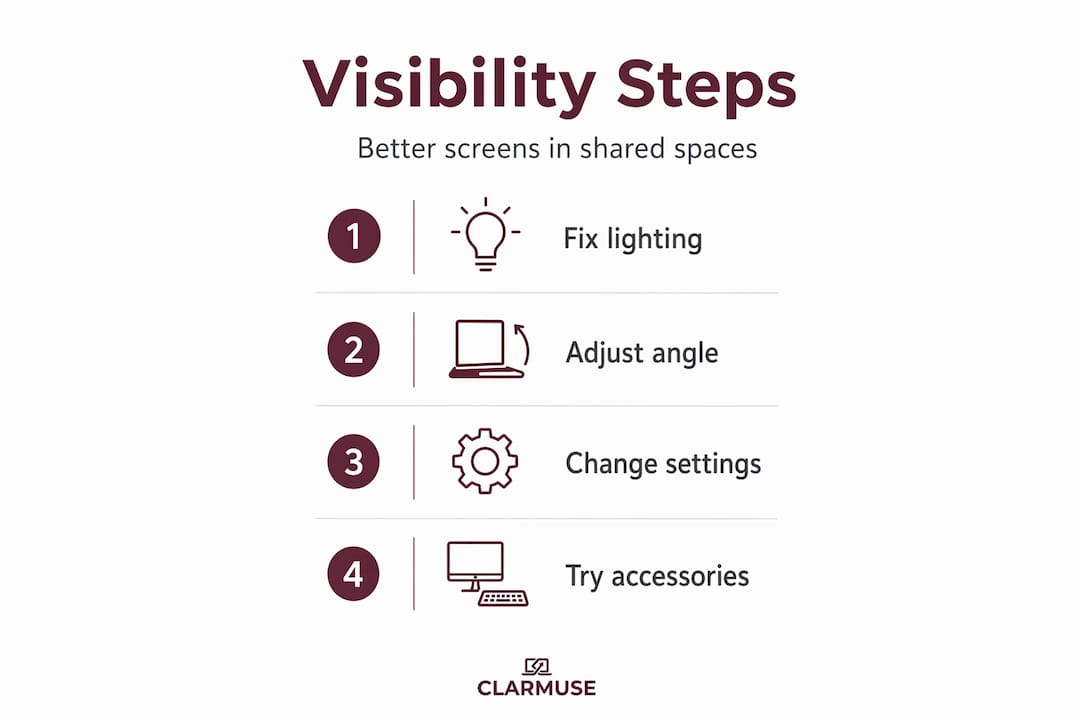
For users who work in truly bright or open environments, screen filter solutions that combine anti-glare treatment with visual privacy offer a practical upgrade over repositioning alone. Magnetic privacy screens attach and detach cleanly without adhesive, so they do not interfere with your MacBook’s design or leave residue.
My take on balancing visibility, color accuracy, and workspace comfort
I have worked from enough shared spaces to have a clear opinion on where people spend their energy solving the wrong problem. Most MacBook users trying to fix screen visibility spend time adjusting brightness sliders when the actual issue is reflection geometry, not luminance output.
In my experience, the order matters. Fix the light environment first: angle the screen, shift your position relative to windows, and check that whoever sat at the desk before you did not turn the monitor brightness down. Then look at settings. Disabling Auto-Brightness in a fixed shared office gives you a stable baseline that lets you actually judge whether your screen is bright enough.
On nano-texture displays, I think the marketing slightly oversells the color accuracy story. Yes, they are better than typical matte films. But if you edit photos or review color-graded video regularly, the slight contrast reduction is noticeable and worth factoring into your purchase decision. For most document, code, or communication workflows in shared offices, the glare reduction is worth it entirely.
What most articles miss is the privacy angle. In bright shared spaces, you are not just managing your own comfort. You are also managing what people around you can see. A screen that is clear and visible to you from the front is equally visible to someone seated at 45 degrees to your side. Accessories that address glare and angular visibility at the same time solve two problems that typically get treated separately.
— Gabriel
Protect your screen visibility with Clarmuse
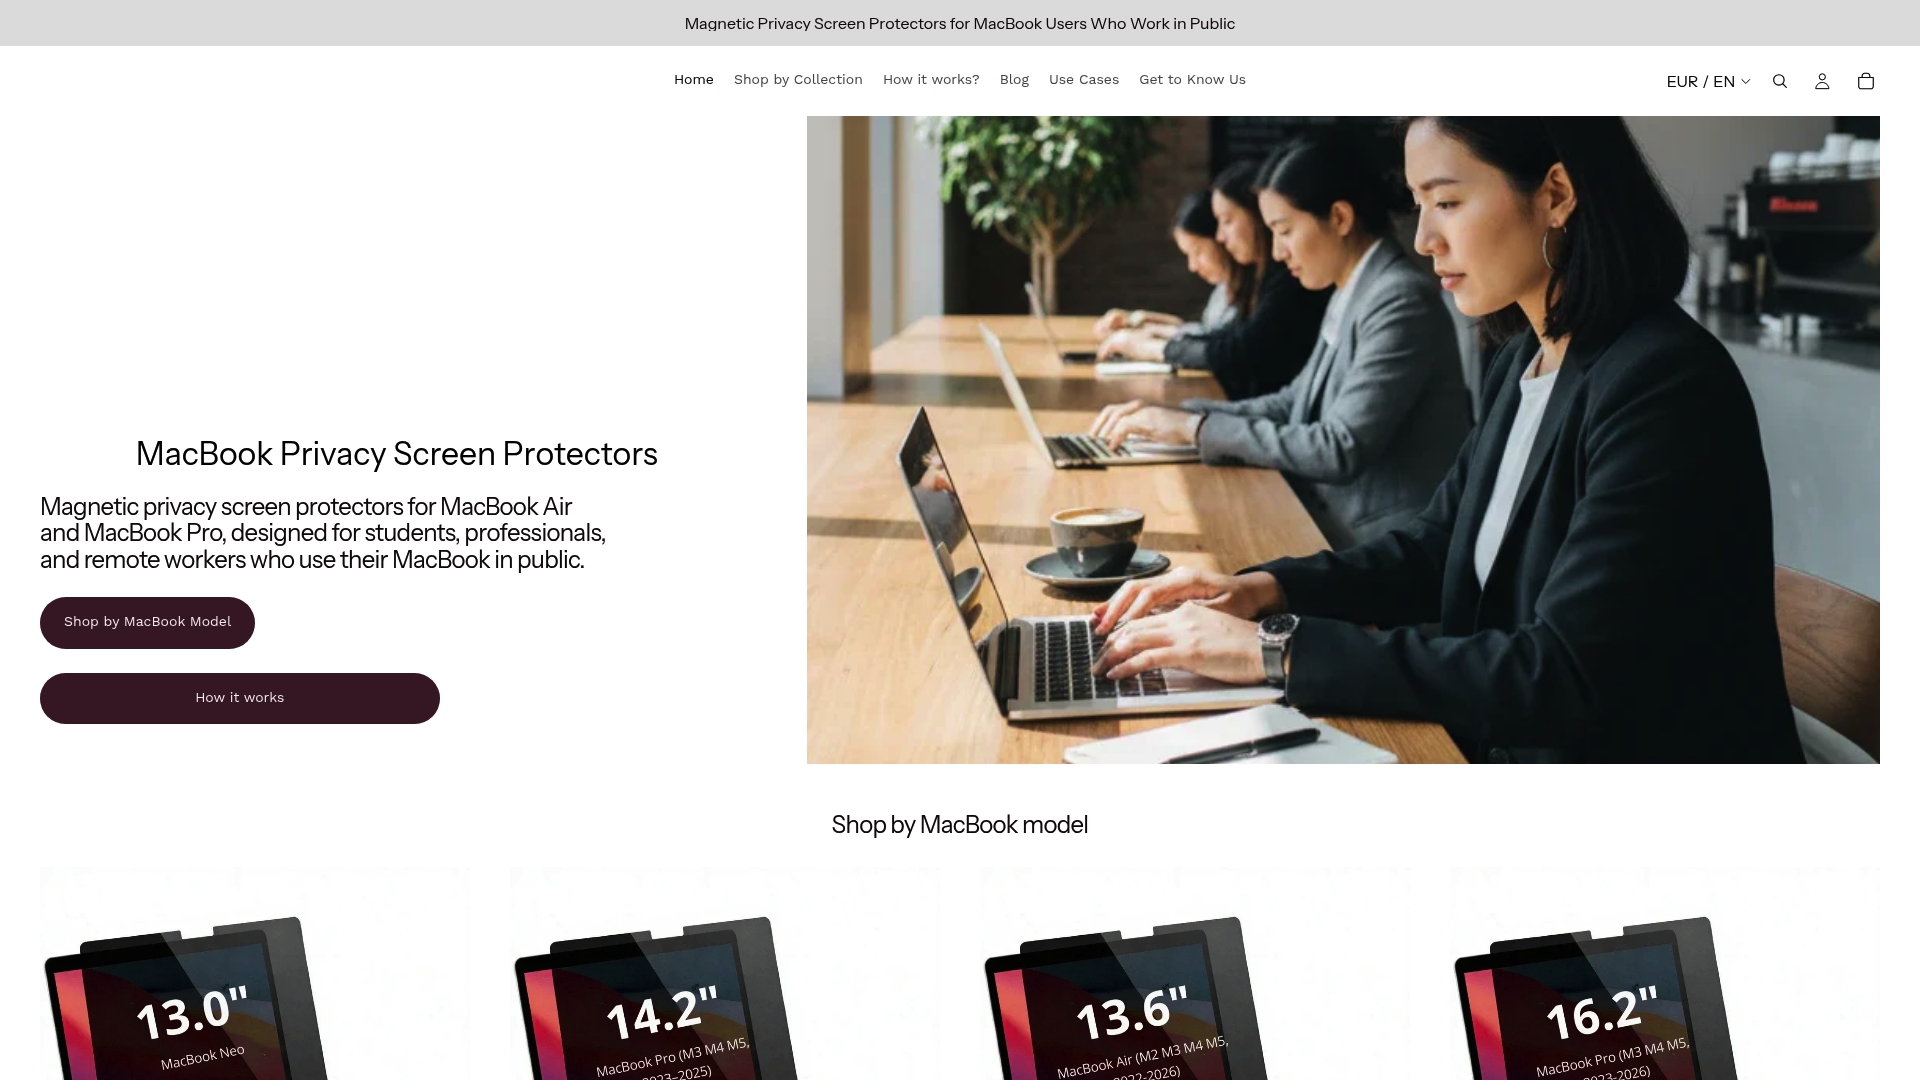
Clarmuse builds magnetic privacy screen protectors designed specifically for MacBook Air and MacBook Pro models. Each filter attaches cleanly via magnets, requires no adhesive, and is sized precisely for specific MacBook screen dimensions so there are no overhang or coverage gaps.
For MacBook users in shared environments, Clarmuse filters reduce side-angle visibility while also cutting surface glare that competes with your display’s brightness. The result is a screen that reads more clearly to you while showing less to people seated beside or behind you. Browse the full range of MacBook Pro privacy filters to find the right fit for your model, or go straight to the MacBook Pro 14.2 protector if you work on the 14-inch model. Clarmuse filters work alongside your macOS settings and positioning habits rather than replacing them.
FAQ
What does screen brightness measured in nits mean for MacBooks?
Nits measure the luminance output of your display. A MacBook with 500 nits, like the MacBook Air M5, provides solid readability in most indoor shared workspaces, though reflections and ambient light significantly affect perceived clarity.
Why does my MacBook screen keep changing brightness on its own?
macOS Auto-Brightness uses an ambient light sensor to adjust display luminance based on surrounding light levels. In shared spaces with changing lighting conditions, this creates frequent and unexpected brightness shifts.
How do I fix a dark external monitor connected to my MacBook?
Check that your cable or adapter supports DisplayPort Alt Mode or Thunderbolt standards, verify the monitor’s own brightness settings are not turned down, and use System Settings under Displays to confirm the correct resolution is applied.
Is nano-texture worth it for shared office use?
For most non-color-critical workflows in bright or window-heavy offices, nano-texture delivers meaningful glare reduction with minimal downside. Users doing precise color-critical work should consider the slight contrast tradeoff before upgrading.
Can a privacy screen protector also reduce glare on a MacBook?
Yes. Magnetic privacy screen protectors like those from Clarmuse reduce side-angle visibility and cut surface reflections, which improves screen readability at the direct viewing angle in bright shared environments.


